News & INSIGHTS
The 5 Must-Have Features for As-Fitted Drawings
When installing or modifying a fire alarm system, as-fitted drawings must be provided. Let us guide you through the 5 must-haves for what your as-fitted drawings must include.
What are the 5 must-have features for your as-fitted drawings?
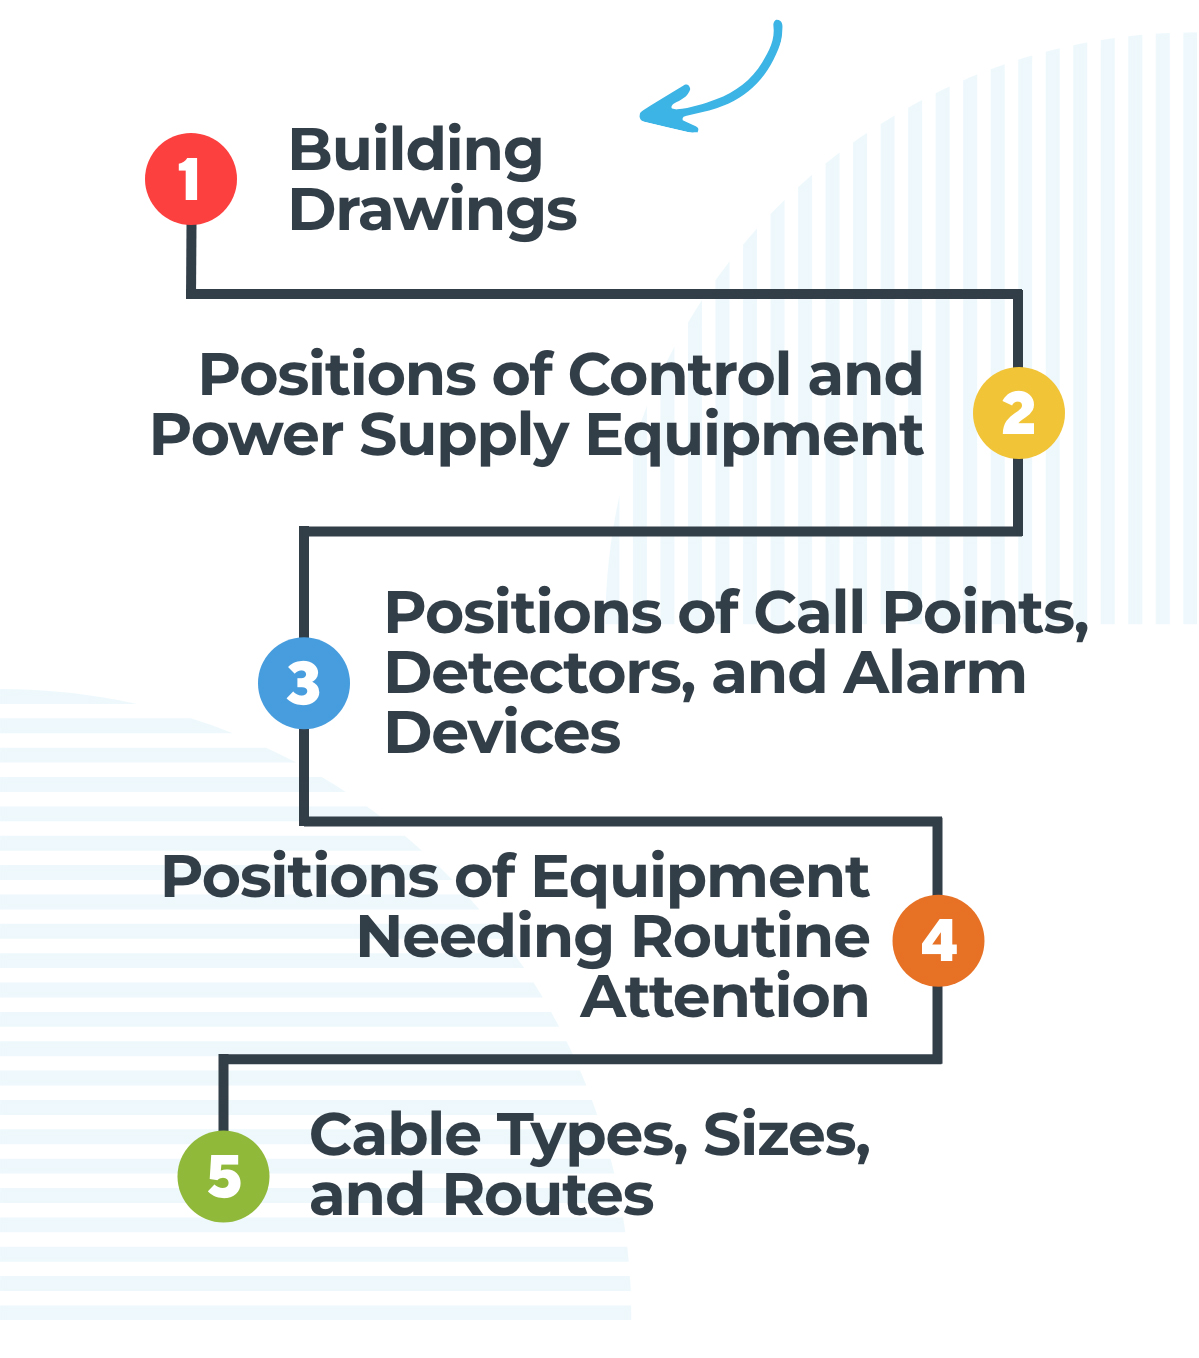
1. Building Drawings
Building drawings are the backbone of accurate as-fitted plans. These serve as the starting point for any fire alarm system installation project. The first thing you must consider when installing or modifying your customer’s fire alarm system is ensuring you have adequate drawings of the building(s). In situations where you can obtain full CAD quality plans, this is a great start. However, as these are not always available, hand-drawn sketches will suffice if they are an accurate representation of the building. Remember, you will need these for the zone plan too. These should include all exits, circulation areas and stairs as a minimum. Remember to outsource your fire alarm zone plans and other fire safety drawings to ensure these are fully compliant.
2. The positions of all controls, indicating and power supply equipment
The positions of all the fire alarm control panels, repeater panels and all associated power supplies must be included. This ensures full compliance and safety measures are taken. Also include the battery cabinets, if these are installed and remote to the panels. Sometimes these are situated in cupboards or storerooms nearby.
3. The positions of all manual call points, fire detectors and fire alarm devices
Mark the positions of all the fire alarm system devices. Use a different symbol for each type of device, these can be simple if you are not working on CAD. The main thing to remember here is to include a key or legend, detailing what each of the symbols are. When marking the positions of interfacing equipment, detail what these are individually interfacing with the fire alarm. (e.g. Access Control, Lift, Door Holders) Add all address numbers (including loop designation) for addressable systems, and all positions of end-of-line resistors. This is usually just noted as ‘EOL’ next to the relevant devices. It is useful to also state the circuit that the EOL relates to, e.g. EOL Z1 for the end of the Zone 1 circuit or EOL SCCT2 for the end of sounder circuit 2.
4. The position of all equipment that might require routine attention or replacement (e.g. short circuit isolators and remove indicators)
These are all other items about the fire alarm system installed. Where short circuit isolators are integral to some or all the devices, it may be clearer to add this to the description in the key. (e.g. Manual Call Point c/w integral short circuit isolator). Add the routes of any aspirating pipework installed. Include the position of the sampling points and any low-level test points that may be present.
5. The type, size, and actual routes of cable
The cable type and size can be taken care of easily. Add a general note to all your drawings detailing the cable type and size. If the note ‘All cable 2c 1.5mm fire rated (red)’ is added, then just any cable that does not fall into this description can be individually identified on the drawing, i.e. 4 core cable. The actual routes of cables must be added. A simple schematic showing just the order in which devices are connected is not sufficient to comply with the recommendations. Therefore just ‘joining the dots’ is not acceptable either.
Likewise, for addressable systems, adding a note just stating wiring is in address number order does not meet the recommendations. The actual routes must be adhered to as much as possible. These must show the order in which devices are connected. Where multiple cables run together, it is acceptable to show these separately. Make sure there is enough space to identify separate cables on the drawing. Also, add the cable from the mains supply to the control equipment. It is good practice to note the distribution board reference and/or circuit breaker number on the drawings too. Remember, the purpose of accurate wiring routes is to enable a person to be able to locate the cable in the event of a fault or the need to modify/extend the installed system.
Should a system be extended, the existing as-fitted drawings should be updated to reflect the changes/additions.
Additional information to include in your as-fitted drawings
Make sure all other documentation works in conjunction with your drawings by giving each of your drawings a unique number. These can then be easily referenced in the remaining completion paperwork.
Audibility test readings can also be added to your as-fitted drawings. These can be listed on separate forms. As you have drawings showing a plan of the premises it is usually clearer to add them here. It is good practice to also add details of your sound level meter, including serial number and calibration date.
Cable test results can also be added to drawings. If you do make sure you are referencing the drawing numbers in the handover paperwork. This is to make sure all your documentation works together.
You should use CAD to complete your drawings. This allows them to be editable for any future changes to the building or system. Most of the items detailed above can be added to your CAD templates to make the process easier.
As-fitted drawings are crucial for the efficiency and reliability of fire alarm systems. Following BS 5839-1:2017 guidelines, these drawings serve as blueprints, providing clarity on equipment positions and cable routes. Precision is key in fire safety, and as-fitted drawings, ideally created using CAD, empower professionals to navigate systems seamlessly.
Trusted by
Contact Us
Fill out our contact form below with your enquiry and one of our team will get back to you ASAP.